To test a golf cart motor, first, check the battery voltage and visually inspect the motor for any damage or loose connections. Then, use a multimeter to measure the motor's resistance and perform a bench test by connecting it to a 12V battery to see if it spins.
Preparation Steps
Safety First: Before starting, ensure the golf cart is turned off and disconnected from any power source. Wear safety gear, including gloves and goggles, to protect yourself from electrical hazards.
Gather Tools: You will need:
- A multimeter
- Jumper cables
- A 12-volt battery (or appropriate voltage for your motor)
- Screwdrivers (to access the motor compartment)
- An ohmmeter (optional for resistance testing)
Step-by-Step Testing Process
1. Test the Power Source
- Check the Batteries: Ensure the batteries are charged and functioning properly. Use a multimeter to measure the voltage of each battery. Each should read around 12 volts (or the specific voltage rating for your golf cart).
- Inspect Connections: Look for any loose or corroded connections that could affect power delivery. Clean and tighten connections as necessary.
2. Visual Inspection of the Motor
- Access the Motor: Remove the panel covering the motor, typically located at the back of the cart. This may require unscrewing several screws.
- Inspect for Damage: Look for any visible signs of wear, such as frayed wires, burnt components, or physical damage to the motor housing.

3. Voltage Testing of the Motor
- Set Up the Multimeter: Connect the multimeter probes to the motor's positive and negative terminals.
- Power On the Cart: Turn on the golf cart and observe the voltage reading. A healthy motor should show a voltage reading close to its rated voltage (e.g., 48 volts for a 48-volt system). If the reading is significantly lower, this may indicate a problem with the motor or its connections.
4. Load Testing the Motor
- Connect a Load: If possible, connect a known load to the motor to see how it performs under operational conditions. This can help identify issues that may not be apparent during idle testing.
- Monitor Performance: Observe the motor's performance under load. Look for any unusual noises, vibrations, or overheating, which could indicate internal issues.
5. Resistance Testing (Optional)
- Use an Ohmmeter: If you suspect issues with the motor's windings, use an ohmmeter to check the resistance across the terminals. This can help identify shorts or open circuits within the motor.
6. Resetting the Motor
- Locate the Reset Button: Many golf cart motors have a reset button located near the main power source. Pressing this button can sometimes resolve minor electrical issues.
- Reassemble and Test: After testing and making any necessary adjustments, reassemble the motor cover and test the cart again to see if the issues persist.
By following these steps, you can effectively test a golf cart motor and diagnose potential issues. If the motor fails to operate correctly after these tests, it may require professional inspection or replacement. Regular maintenance and timely testing can help prolong the life of your golf cart motor and ensure optimal performance on the course.
How to test a 36 Volt Golf Cart Motor?
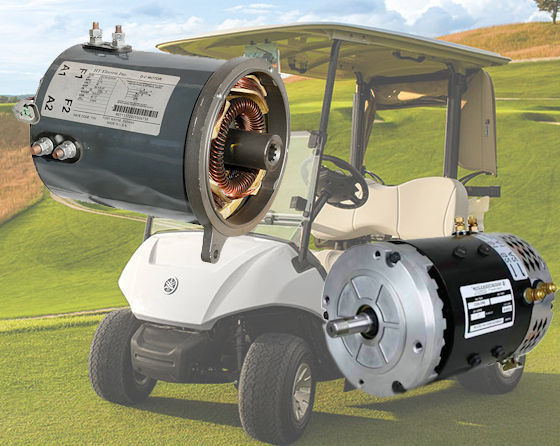
To test a 36-volt golf cart motor, first, check the battery voltage to ensure it's around 38-39 volts, then disconnect the motor, measure the resistance between terminals (A1 to A2 and F1 to F2) with a multimeter, and ensure there's no continuity between the terminals and motor casing. If possible, perform a bench test by connecting the motor to a 12V battery; the motor should spin if it's functioning properly.

Preparation
Safety First: Ensure the golf cart is turned off and disconnected from the battery. Wear safety gear, such as gloves and goggles, to protect against electrical hazards.
Gather Tools:
- A multimeter
- Jumper cables (optional for further testing)
- Screwdrivers (to access the motor compartment)
Testing Steps
1. Visual Inspection
- Check for Damage: Inspect the motor and wiring for any visible signs of wear, such as frayed wires or corrosion.
- Secure Connections: Ensure all electrical connections are tight and free from corrosion, as loose or corroded connections can lead to performance issues.
2. Measure Voltage Output
- Set Up the Multimeter: Turn the multimeter to the DC voltage setting.
- Connect the Multimeter: Attach the red probe to the positive terminal and the black probe to the negative terminal of the motor.
- Power On the Cart: Turn on the golf cart and observe the voltage reading on the multimeter. A properly functioning 36-volt motor should show a voltage reading close to 36 volts. If the reading is significantly lower, this may indicate an issue with the motor or its connections.
3. Continuity Testing
- Disconnect Power: Ensure the golf cart is turned off and disconnected from the battery.
- Set Multimeter to Continuity Mode: Change the multimeter setting to continuity.
- Test the Motor Windings: Place the multimeter probes on the terminals of the motor. A continuous beep or a reading close to zero ohms indicates that the windings are intact. If there is no continuity, the motor may be damaged.
4. Load Testing (Optional)
- Connect a Load: If possible, connect the motor to a load to see how it performs under operational conditions. This can help identify issues that may not be apparent during idle testing.
- Monitor Performance: While under load, observe the motor for any unusual noises or overheating, which could indicate internal problems.
5. Battery Voltage Check
- Test Individual Batteries: Since a 36-volt system typically consists of three 12-volt batteries, check the voltage of each battery individually. Use the multimeter to ensure each battery reads around 12 volts. If any battery is significantly below this voltage, it may need replacement.
How to test a 48 Volt Golf Cart Motor?
To test a 48-volt golf cart motor, first, check that the battery pack is fully charged and reads around 50-52 volts using a multimeter. Then, disconnect the motor, measure the resistance between terminals (A1 to A2 and F1 to F2) with a multimeter, ensure there's no continuity between the terminals and motor casing, and perform a bench test by connecting the motor to a 12V battery; it should spin if functioning properly.

Preparation
Safety First: Ensure the golf cart is turned off and disconnected from any power source. Wear safety gear, including gloves and goggles.
Gather Necessary Tools:
- A multimeter
- Jumper cables (optional)
- A load tester (optional)
Step-by-Step Testing Process
1. Visual Inspection
- Check for Damage: Inspect the motor and its connections for any visible signs of wear, such as frayed wires or corrosion.
- Examine Wiring: Ensure that all wiring connections are secure and free of corrosion, as loose or damaged connections can affect performance.
2. Testing Voltage Output
- Set Up the Multimeter: Configure your multimeter to measure DC voltage.
- Connect the Multimeter: Attach the red probe to the positive terminal and the black probe to the negative terminal of the motor.
- Power On the Cart: Turn on the golf cart and observe the voltage reading. A healthy motor should show a voltage close to 48 volts. If the reading is significantly lower, this may indicate an issue with the motor or battery connections.
3. Load Testing the Motor
- Connect a Load: If possible, connect the motor to a known load to assess its performance under operational conditions. This can help identify issues that may not be apparent during idle testing.
- Monitor Performance: While under load, observe the motor for any unusual noises, vibrations, or overheating, which could indicate internal problems.
4. Testing Individual Batteries
- Check Battery Voltage: Since a 48-volt system typically consists of six 8-volt batteries, test each battery individually using the multimeter. Each battery should read around 8.4 volts when fully charged. If any battery reads significantly lower, it may be failing and affecting overall performance3.
- Perform a Load Test on Batteries: Use a load tester to check the capacity of each battery. This can help identify weak batteries that may not hold a charge effectively.
5. Inspecting Motor Components
- Check Motor Brushes: If you have access, inspect the motor brushes for wear. Worn brushes can lead to poor performance and should be replaced if necessary.
- Examine the Controller and Solenoid: Ensure that the motor controller and solenoid are functioning properly, as faults in these components can lead to erratic motor behavior or failure to engage.
Testing Procedure for Golf Cart Motor with a 12V Battery
To test a golf cart motor with a 12V battery, connect the battery to the motor terminals using jumper cables and observe if the motor runs. Use a multimeter to check for proper voltage and continuity in the circuit to ensure the motor is functioning correctly.
1. Gather Necessary Tools:
- 12V Battery: Ensure it is fully charged.
- Multimeter: For measuring voltage and continuity.
- Jumper Cables: To connect the battery to the motor.
- Safety Gear: Gloves and goggles for protection.
2. Safety Precautions:
- Ensure the golf cart is turned off and the key is removed.
- Wear safety gloves and goggles to protect against any accidental sparks or battery acid.
3. Visual Inspection:
- Check the motor and battery for any signs of damage, corrosion, or loose connections. Ensure that terminals are clean and free from corrosion.
4. Connect the 12V Battery:
- Use jumper cables to connect the 12V battery to the motor. Connect the positive terminal of the battery to the positive terminal of the motor and the negative terminal of the battery to the negative terminal of the motor.
5. Voltage Testing:
- Before connecting, use a multimeter to check the voltage of the 12V battery. Set the multimeter to the DC voltage setting (typically 20V setting) and connect the probes to the battery terminals. A healthy battery should read around 12.6V or higher.
- After confirming the battery voltage, connect the battery to the motor as described above.
6. Functional Test:
With the battery connected, activate the motor (if the golf cart has a throttle or switch). Observe the motor's operation:
- It should turn smoothly without unusual noises (like grinding or whining).
- If the motor does not turn on, check the connections and ensure the battery is charged.
7. Continuity Test:
Disconnect the battery after testing. Set the multimeter to the continuity setting or ohms setting. Check for continuity between the motor terminals:
- There should be continuity between the terminals (A1 & A2 for the armature and S1 & S2 for the field winding).
- No continuity should exist between the motor terminals and the motor casing, indicating no shorts.
8. Load Test (Optional):
- If possible, perform a load test by applying a load to the motor while it is connected to the battery. This can help assess the motor's performance under operational conditions. Monitor the voltage drop during this test; a significant drop may indicate issues with the motor.
9. Professional Assessment:
- If the motor fails to operate correctly or if there are any abnormalities during testing, consider seeking help from a professional technician experienced in electric golf cart repairs.
Is golf cart a Motorized Vehicle?
Yes, a golf cart is considered a motorized vehicle as it is powered by an electric motor or a gas engine to transport people and equipment.
Golf carts are small, motorized vehicles specifically designed for transporting golfers and their equipment around a golf course. They are typically powered by either electric or gas engines, making them efficient for short-distance travel. The primary purpose of a golf cart is to provide a convenient means of transportation on golf courses, allowing players to navigate the course without the physical exertion of walking while carrying their clubs.

While golf carts are commonly associated with golfing, they have also found utility in various other settings, including residential communities, resorts, and even some urban areas where they may be used for short trips. In some places, golf carts can be modified to meet street-legal requirements, allowing them to be driven on public roads at low speeds.
In summary, golf carts are indeed motorized vehicles, designed primarily for ease of transport in specific environments, particularly golf courses.


.jpg)


.jpg)


.png)
.png)